2014 Garden Successes & Failures

One of the really important skills of being a gardener is the ability to look back on the season and reflect on what worked and what didn’t work. And I will freely admit that I am not the most compliant person when it comes to this task. A few years ago I dedicated a notebook to keeping track of things as they would come up – it worked for a season and then I just didn’t really bother picking it up again. Another thing I am guilty of is the “I’ll remember that” statement – and of course I always forget. So I’m saying it right here – I am going to change. I will keep gardening records and I will stick to it. Frankly, it is silly not to. How am I going to remember which green tomato I liked and which one I didn’t? It is best to save myself the effort of growing them both again if I just make a note of which one I liked and which one was a waste of precious growing space.

The season started off a bit slow. We decided to do a home renovation right at the beginning of the gardening season (so smart!) and then instead of spending the long weekend working in my garden, I took off to help my sister plant her garden. Then when I finally got around to the garden, it was the end of May going in to the first week of June. Luckily I didn’t pile on too many big garden projects so I wasn’t feeling too overwhelmed at the beginning. Here are some reflections for the season:

IMG_2342

A tiny bit of success with my first cauliflower grown from seed – unfortunately the rest looked nothing like this one.

Successes

– Dealing with Sod Mountain. It was one day of really hard work but it paid off. And I’m looking forward to utilizing this area a bit more next year by growing some squash in the raised bed. I will need to remember to build some chicken wire domes to protect young squash seedlings though.

– Growing peppers in the greenhouse. I think this was one of my proudest gardening moments from this year. And I’ve got at least 15 new varieties on my wish list for next year! So basically my entire greenhouse is going to be peppers.

– Mulching the front yard. This had been on my to-do list ever since I started digging out sod in the front yard several years ago. We were able to cover all of the beds in mulch and add a nice rock border with collected rocks (my parents have a gravel pit on their property!), so now it is looking much neater and is a lot more low maintenance. The plan for next year is to do a bit of an overhaul of the front yard, moving things around and adding some raised beds – and also removing the remaining sod, so I will need to add quite a bit more mulch, but for now it is looking nice!

– The galvanized steel planter. I was actually surprised at how well the livestock tank worked as a raised bed because I first saw the idea in a gardening magazine and kind of figured it might just be something they made pretty for the photo shoot and then everything died immediately afterwards. I’m so optimistic! Anyway, I really liked the look so I gave it a try and it worked wonderfully. I grew tomatoes in the planter and while I possibly planted them too close together, they did exceptionally well – and seemed to love the heat and reflection from the metal. I’m curious to see how long the tank will hold up for – it is heavy duty as it needs to stand up to cows and other heavy livestock so I feel pretty good about it lasting for quite awhile.

– Corn. I think everyone was a bit surprised that I grew corn. And it was delicious! The key was to start it in the house about a month early (thanks for the tip, Mom!).

IMG_3803

Greens are always very successful in my colder climate garden.

Failures

– Growing eggplant in the greenhouse. I think I’m done trying eggplant. I grew 3 very very small eggplants (only 1 was actually big enough to resemble an eggplant – shown in the photo below). This was probably my fourth year attempting to grow eggplant and although it was the most successful year because I actually got something more than nothing, it wasn’t enough success to justify trying it again. I just don’t think it was meant to be. And that’s okay – our local farmer’s market has some great greenhouse grown eggplants.

IMG_2400

– Dirty disgusting Cabbage Loopers. I wiped out the population when I first discovered them and things seemed to be fine after that – I was even able to harvest two decent sized cauliflower heads from the plants in October! Then I discovered the caterpillars in the community garden when I went to clean out my bed in October – they’d done quite a bit of damage over there and I ended up tossing a lot of the kale. Next year I’m going to be on the lookout for these creatures early on in the season, but I’m also going to either try an all-natural spray to kill them or consider a row cover. The other thing is, I didn’t find too much of a taste difference between the cauliflower I grew and the cauliflower I purchase at the market. Maybe I’m being crazy here, but it might not be worth it to attempt growing cauliflower, broccoli or brussels sprouts again. I will continue growing kale, but I will keep an eye on it for space bugs.

– Carrots. I don’t know what it is, but the last 3 years I have had completely unremarkable carrot harvests. The roots are stunted or insect damaged. Maybe I am not meant to grow carrots anymore until I have a large in-ground garden. I blame myself for this one.

– Mason bees. I don’t know what happened with my bees. What I want to believe is that I released them and they found a better yard to live in and made tons of babies. I guess I will never know what really happened to them, but I’m going to assume that I released them in a crappy location in my yard and they left – they did all emerge from their cocoons and flew away because I did not find any dead bodies in the release area. I’ve got a better location picked out for next year. And I have had some success with mason bees in the past, so I’m chalking it up to poor planning on my part.

– Squirrels. I lost a lot of seedlings (especially tomatoes and squash) to pesky little squirrels. I mentioned it above but I will be constructing some chicken wire domes to protect my young seedlings next spring.

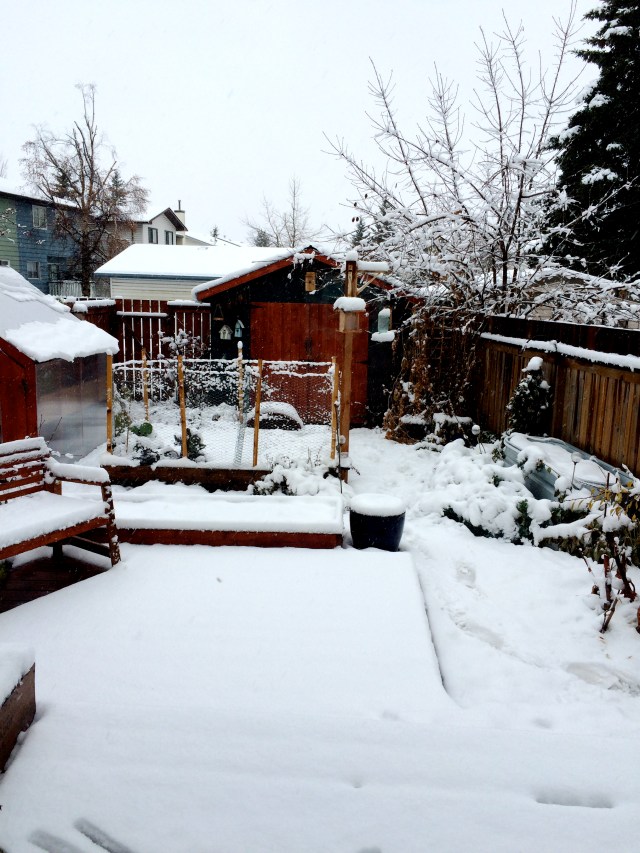
One of the things I am glad that I took the time to do was take regular pictures of the back yard. The intention was to do this bi-weekly, but it turned into once every two months (which is better than nothing!). This gives you an idea of what my garden looks like throughout the seasons:

Processed with Moldiv

Clockwise from top left: March 2014, June 2014, October 2014, August 2014

Even though it doesn’t always seem like it to me, we did accomplish quite a bit in the garden this year and it really does keep getting better with every growing season. I’m really looking forward to what next year has to bring us – trying lots of new hot peppers, a few new tomatoes, and hopefully expanding our edible growing operation in to the front yard. In addition to that, we’re hoping to remove most, if not all, the sod from our front yard (it’s a huge project)! What are some of the highlights and lowlights from your growing season?


The Last of the Tomatoes

You might remember that we had an unexpected snow storm in early September which forced me to harvest all of my unripe tomatoes far earlier than I’d wanted. So we’ve been eating away at them for a few weeks as they ripened and I ended up giving away quite a few, but we still had lots left over. They’d all ripened indoors and were sitting in cardboard boxes in the corner of my dining room up until a couple of hours ago. Some were even starting to resemble prunes, so I decided I needed to do something with them now or run the risk of losing them. I’ve heard of people freezing cherry tomatoes whole, but I’ve never actually tried it. My go-to method is roasting them first. And it is so easy!

First, start by washing and drying the tomatoes and cutting them up – I had tomatoes of all sizes: the tiny ones were just stabbed with a knife, the regular cherry tomatoes were cut in half, and the smallish/medium sized tomatoes were quartered. Toss the cut up tomatoes with some olive oil, salt and pepper (you may choose to add some herbs as well, such as basil or oregano – or get really crazy and add some hot chili flakes), then lay them in a single layer on a baking sheet – I covered mine in foil and then parchment paper because I am too lazy to do dishes (let’s call a spade a spade here).

IMG_2552

Next you’ll roast them in the oven at about 350 degrees for 45 minutes or so (until they look roasted enough to you – very scientific).

IMG_2557

After they’re roasted to perfection, let them cool to room temperature and put them in to smaller freezer bags. In the winter, I add them to homemade pizza and add into soups in place of canned tomatoes (like beef barley and minestrone). Roasting them really brings out the flavor and preserves that little bit of summer to enjoy throughout the dark and cold months.

A Little Project

With the gardening season basically wrapped up, I am settling in for winter. This includes getting to all of those indoor projects that I’ve been putting off for months (I’m looking at you powder room!), as well as creating new projects to do (because I just love to pile on the projects!). One of those projects that I’ve been wanting to do for awhile is put together a little terrarium. I’ve made some simple terrariums before using just plants and glass vessels but I’ve always killed them by getting high maintenance plants (that’s my theory anyway).

Terrariums have intrigued me ever since they started to gain popularity a couple of years ago. The reason I think I am so attracted to them is that they remind me of building dioramas in school as a kid but also because they allow creativity in the gardening world. Sometimes gardening gets a bad rap as being an old person activity, which I am fine with because I’m basically a 75 year old woman at heart, but gardening can also be an excellent creative outlet for people of any age.

I mentioned it above, but I took my inspiration from building dioramas in school as a kid, as well as a bit of inspiration from my model train-crazed brother-in-law who has an amazing layout. I would love to be able to dedicate the time and money into making adult-like dioramas in shadow boxes but I thought I’d start small to begin with. I had a lot of fun putting together the terrarium itself but also a ton of fun searching online before-hand for inspiration and ideas, including this X-Files themed terrarium (!!!!!), but in the end, I decided to put together my own. I might still do a version of the X-Files one, it is pretty amazing (we’re huge X-Files geeks in my house!).

So here is the finished terrarium in all of its glory – a little family that have all piled in to the car during summer vacation stopping to take a photo. I kept it fairly simple but I may do some revisions, such as adding a dead body in the woods behind the innocent family (I can be so dark sometimes), but for now I’ll keep it as is.

IMG_2539

There are tons of how-to instructions online for building your own terrarium so I won’t go in to all the detail. The main thing is to ensure you choose plants that you can easily care for and that you can provide with the ideal growing conditions, ensure your vessel has adequate drainage, and place it in an area you will not forget about (or set reminders in your phone to regularly check your plant).

The vessel is a brass serving bowl that I picked up at Target (I lined the inside with plastic before I put any dirt in it as well as put a few rocks in the bottom for drainage and so I wouldn’t have to add so much dirt), the figurines are model train HO scale figures I purchased online and the plants I purchased at my local garden centre. I’m really looking forward to the plants spreading a bit and filling out the bowl.

IMG_2528

Now fingers crossed I don’t murder the terrarium! It is a long weekend for me here so I have a lot of things on the agenda, including picking up a new vintage piece (I’ll fill you in later – I have some bedroom updates planned!), working on my powder room, hopefully finishing my sewing table project, doing some knitting, and hopefully lots of relaxation! Whatever you’re doing this weekend, I hope it is something special!

Drying Hot Peppers

I guess I didn’t realize how prolific my Chinese 5 Color hot pepper really was until a few weeks ago when I harvested all of the remaining partially ripened peppers. There were a lot of hot peppers. I tried to eat as many as I could fresh, but I could only tolerate eating a small portion of them in fresh salsa without the peppers taking over the entire flavor and burning my face off. I like burning my face off a bit, but I love the taste of home grown tomatoes more, so it was taking a long time to use up the extra hot peppers. Then last week I noticed that some of them were starting to wrinkle, so drastic measures were in order. I considered freezing them whole but then decided to try drying them to make my own hot pepper flakes for adding into chili during the cold months.

Drying peppers is unbelievably easy. I don’t have access to a dehydrator so I wasn’t sure how well drying them in the oven would work, but I was pleasantly surprised when my peppers came out dried and a nice deep red color after a few hours.

Here’s how I did it:

1.Preheat the oven to 200 degrees Fahrenheit (adjust for your oven – I have an older electric oven that runs a little high so I put mine at about 175)

2. Wash and dry the peppers thoroughly. It’s okay if they are wrinkly!

IMG_2354

3. Remove and discard any stems and cut the peppers in to smaller pieces. My peppers were fairly small to begin with so I cut them in half but I did have a wrinkly Joe E. Parker that I threw in but cut into pieces about the same size as the small halved peppers. I included all of my pepper seeds but you can remove and discard these if you want a milder end result.

4. Spread in a single layer on a baking sheet (I used a parchment covered sheet)

IMG_2355

5. Dry in the oven for around 2 or so hours, checking every 30-45 minutes and adjusting the time as needed. They need to be completely dry to store properly. Mine took around 2 1/2 hours.

IMG_2363

6. Remove from oven and let sit for an hour or so until completely cool and dry. I let mine sit overnight because I was being lazy.

IMG_2373

7. Crush using a mortar and pestle if you have one, otherwise you could try a spice grinder or just crush them using a spoon – whatever works.

8. Store in an airtight container.

IMG_2374

So easy and so delicious. Also the drying peppers will make your house smell so amazing for those few hours. Do you have other methods of preserving your hot peppers?

An End to The Week From Hell

Things are starting to get back to normal after my terrible week of broken dishwashers (the verdict is in, it is dead forever), a migraine that wouldn’t end, and an emergency basement clean up & reorganization! I couldn’t be happier that the week from hell is over. We spent every week night cleaning, moving things around, making a big expensive trip to Ikea (with the help of my favorite little brother!), then building said Ikea, and finally putting the whole space back together in a much more organized manner. Saturday night was spent vegetating in front of the television before falling asleep about 45 minutes later (it could also have had something to do with the leftover Halloween candy binge I’d gone on earlier).

Through all the crap this week, I have been able to find some positives:

1. Yesterday morning we met some friends for an early lunch and then stopped at my favorite store in historic Inglewood, Plant, where I picked up a couple of new air plants as well as a few little vessels for my ever growing collection of cacti and succulents (if you’re ever in the area stop by my favorite knitting store too, Stash). Fall is a weird time for me because I think I start to get a bit of indoor plant fever – I’ve just gone from caring for a million plants in my garden to only caring for a few in my house so I always feel the urge to increase the indoor plant population around this time. There are truly worse things I could be doing.

IMG_2504

2. I’ve also been trying to make some headway on a few knitting projects. I’m officially 1/2 way through my first Xmas gift and about 1/10 of the way through my first sweater (actually a shrug, but whatever), and about 30 minutes away from finishing a pair of slippers for myself (the jury is still out on whether or not that project was a success… I think I’ll need to make some adjustments to the pattern for next time). I’m also trying to finish up a cross-stitch project I started almost a year ago (a year!!! Really Megan?!!) and I’m so close. Maybe today will be the day? I really like to take on too many projects.

IMG_2512

3. And then I decided to “save” another discarded item. This chair was in pretty rough shape (dirty and very rusty!) when I picked it up but I figured there was no harm in trying to bring some life back in to it – and also, I was looking for another chair! I spent a couple of hours scrubbing using some steel wool and some Barkeeper’s Friend and it is looking much better – the chrome base shined up really nice! I’m still waffling on replacing the upholstery – it is faux leather so I think adding real leather would be much nicer, as well as fairly inexpensive and would require very little time. Thoughts? It is a nice chair so I’m glad I was able to clean it up.

IMG_2521

Other than that, it started snowing yesterday afternoon and hasn’t really let up since (maybe not a positive thing but it is pretty!). So I haven’t had any time to work on finishing re-finishing my little sewing table (although I have no idea where I would have found time anyway). I’ve also been looking at the powder room all week dreaming about finishing sanding the drywall, so I’m hoping to get that finished by the end of the week.

IMG_2508

And somewhere in between all of that I’m going to work every day, eating and sleeping. I’m feeling much more optimistic about this week though, maybe next post I’ll have a finished project to share – fingers crossed!