Casual Fridays Part 3

The weekend is here! I’m always excited when Friday arrives, but some Fridays bring that extra bit of excitement/relief, you know? November has been an absolutely insane month so far, so I’m hoping the rest of it calms down a bit. It seems that everyone is talking about the holidays so much earlier this year, so I definitely have that on my mind. Next week I’m going to start putting together my holiday posts, starting with a DIY/handmade gift guide! But until then, here are some of my current favorite things:

1(14)

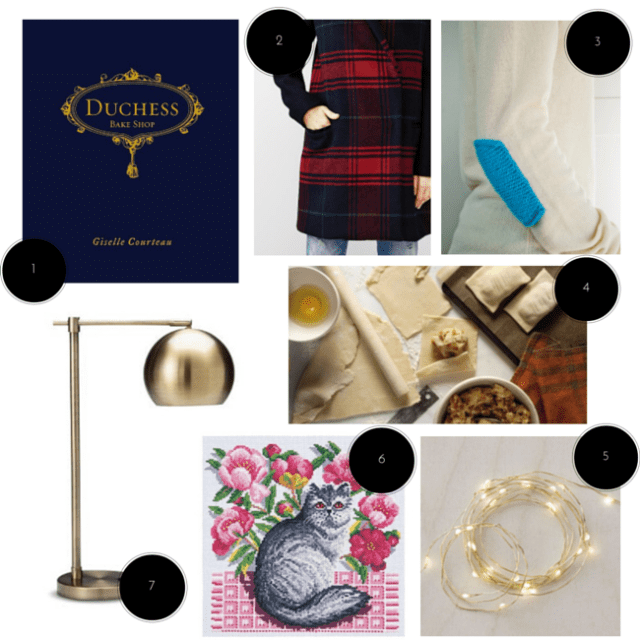
1. Duchess Bake Shop cookbook $45. My favorite bakery, Duchess Bake Shop, just put out their first cookbook and I cannot be more excited for it. The Duchess is probably the only bakery I would ever make an hour detour for on a road trip because it is that good (and yes, I have made that detour).

2. I’m on the hunt for a new wool coat and while I’m going to scour the thrift store first, I do have my eye on this lovely from GAP, $178. 

3. Knitted elbow patches via Purl Bee. My favorite sweater, which is now too shameful to even wear outside of the house, had massive elbow holes. So I whipped up some of these elbow patches and I’m thankful that my sweater will have a bit more time on this earth with me.

4. Caramelized onion & potato hand pies, via Beekman 1802. Cold weather + pies = perfection, especially if they happen to be hand pies. This recipe looks so easy and making a large batch seems like the perfect plan (I love freezing things for eating at a time that you don’t feel like cooking, but also don’t feel like leaving the comfort of your home). I’m definitely trying this recipe out on the weekend!

5. Twinkle lights, Crate & Barrel $14.95 – I’m absolutely loving these battery powered twinkle lights. I bought a string last year from Restoration Hardware, but I see other stores offering similar strings for a little bit less dough (the Crate & Barrel version is $10 cheaper for the same length of string!). I love that the strings are metallic – much prettier than the typical plastic! I am going to put these lights on everything.

6. Cat cross stitch pattern – DMC $FREE – With the cold weather and not wanting to leave the house unless absolutely necessary, I’m really into cross stitching right now. I’m currently working on a holiday project (hopefully it will be finished soon and I can share it!), but I came across this cat pattern that I’m dying to make – I’ll probably just do the actual cat and then design my own background. Now the real challenge will be finishing my current project before starting on this one.

7. I’m thinking about lighting again (while I am in love with the string lights above, they are more decorative than functional).  This seems to be a common theme around this time of year – there never seems to be sufficient lighting in my living room, which becomes a problem when I’m knitting or cross stitching in front of the television. I have always thought it was a bit bizarre that our living room does not have any hardwired lighting (our old rental didn’t either!). I think two more table lamps might do the trick and I’ve got my eye on this really pretty and inexpensive option from Target for $50. I have seen more expensive and nicer versions from Schoolhouse Electric and Rejuvenation, so if Target does not pull through for me, I will probably hold off and buy the more expensive option.

I don’t have a ton of stuff planned for the weekend – I just picked up season 4 of Boardwalk Empire so I’m hoping to binge watch that (we don’t have cable or satellite television so all the episodes are brand new to us!). Otherwise, I was planning to do a bit of cooking (obviously those hand pies above but I’m also craving hearty stews with fresh baked bread!), work on some projects around the house and do some work on my holiday gift knitting. I hope your weekend is full of rest, food and whatever else makes you happy!

Roasted Beet Chips

A few years ago my brother took me for lunch to a little sandwich shop and said “You have to try the beet chips. Trust me”. Of course I agreed because I love beets. And the beet chips were amazing. So after that I had to come home and make them for myself because that’s just what I do. They are really simple to make and an excellent side dish to basically everything. Or you could just make a batch and eat them on their own – I don’t judge.

IMG_3360

Preheat your oven to about 350 degrees. You’ll have to wash your beets, cut off and discard the tops. Slice the trimmed beets fairly thin – using a food processor or mandolin slicer is your best bet because all your beets will be cut in less than a minute.

IMG_3364

Toss the beets in olive oil, some balsamic vinegar, fresh rosemary, salt and pepper. Stick them in the oven for 25 minutes, turn them and put them back in for another 15-25 minutes (depending on your oven – mine is an older electric oven that runs a little high so it took less time for me).

IMG_3368

Done! Some of my edges may have been a little crispy/slightly burnt, but I swear it was intentional (my partner likes them this way!). If you want to add a little something more, you can make a smokey/tangy dipping sauce using mayo, a splash of lemon juice and some paprika. Enjoy!

2014 Garden Successes & Failures

One of the really important skills of being a gardener is the ability to look back on the season and reflect on what worked and what didn’t work. And I will freely admit that I am not the most compliant person when it comes to this task. A few years ago I dedicated a notebook to keeping track of things as they would come up – it worked for a season and then I just didn’t really bother picking it up again. Another thing I am guilty of is the “I’ll remember that” statement – and of course I always forget. So I’m saying it right here – I am going to change. I will keep gardening records and I will stick to it. Frankly, it is silly not to. How am I going to remember which green tomato I liked and which one I didn’t? It is best to save myself the effort of growing them both again if I just make a note of which one I liked and which one was a waste of precious growing space.

The season started off a bit slow. We decided to do a home renovation right at the beginning of the gardening season (so smart!) and then instead of spending the long weekend working in my garden, I took off to help my sister plant her garden. Then when I finally got around to the garden, it was the end of May going in to the first week of June. Luckily I didn’t pile on too many big garden projects so I wasn’t feeling too overwhelmed at the beginning. Here are some reflections for the season:

IMG_2342

A tiny bit of success with my first cauliflower grown from seed – unfortunately the rest looked nothing like this one.

Successes

– Dealing with Sod Mountain. It was one day of really hard work but it paid off. And I’m looking forward to utilizing this area a bit more next year by growing some squash in the raised bed. I will need to remember to build some chicken wire domes to protect young squash seedlings though.

– Growing peppers in the greenhouse. I think this was one of my proudest gardening moments from this year. And I’ve got at least 15 new varieties on my wish list for next year! So basically my entire greenhouse is going to be peppers.

– Mulching the front yard. This had been on my to-do list ever since I started digging out sod in the front yard several years ago. We were able to cover all of the beds in mulch and add a nice rock border with collected rocks (my parents have a gravel pit on their property!), so now it is looking much neater and is a lot more low maintenance. The plan for next year is to do a bit of an overhaul of the front yard, moving things around and adding some raised beds – and also removing the remaining sod, so I will need to add quite a bit more mulch, but for now it is looking nice!

– The galvanized steel planter. I was actually surprised at how well the livestock tank worked as a raised bed because I first saw the idea in a gardening magazine and kind of figured it might just be something they made pretty for the photo shoot and then everything died immediately afterwards. I’m so optimistic! Anyway, I really liked the look so I gave it a try and it worked wonderfully. I grew tomatoes in the planter and while I possibly planted them too close together, they did exceptionally well – and seemed to love the heat and reflection from the metal. I’m curious to see how long the tank will hold up for – it is heavy duty as it needs to stand up to cows and other heavy livestock so I feel pretty good about it lasting for quite awhile.

– Corn. I think everyone was a bit surprised that I grew corn. And it was delicious! The key was to start it in the house about a month early (thanks for the tip, Mom!).

IMG_3803

Greens are always very successful in my colder climate garden.

Failures

– Growing eggplant in the greenhouse. I think I’m done trying eggplant. I grew 3 very very small eggplants (only 1 was actually big enough to resemble an eggplant – shown in the photo below). This was probably my fourth year attempting to grow eggplant and although it was the most successful year because I actually got something more than nothing, it wasn’t enough success to justify trying it again. I just don’t think it was meant to be. And that’s okay – our local farmer’s market has some great greenhouse grown eggplants.

IMG_2400

– Dirty disgusting Cabbage Loopers. I wiped out the population when I first discovered them and things seemed to be fine after that – I was even able to harvest two decent sized cauliflower heads from the plants in October! Then I discovered the caterpillars in the community garden when I went to clean out my bed in October – they’d done quite a bit of damage over there and I ended up tossing a lot of the kale. Next year I’m going to be on the lookout for these creatures early on in the season, but I’m also going to either try an all-natural spray to kill them or consider a row cover. The other thing is, I didn’t find too much of a taste difference between the cauliflower I grew and the cauliflower I purchase at the market. Maybe I’m being crazy here, but it might not be worth it to attempt growing cauliflower, broccoli or brussels sprouts again. I will continue growing kale, but I will keep an eye on it for space bugs.

– Carrots. I don’t know what it is, but the last 3 years I have had completely unremarkable carrot harvests. The roots are stunted or insect damaged. Maybe I am not meant to grow carrots anymore until I have a large in-ground garden. I blame myself for this one.

– Mason bees. I don’t know what happened with my bees. What I want to believe is that I released them and they found a better yard to live in and made tons of babies. I guess I will never know what really happened to them, but I’m going to assume that I released them in a crappy location in my yard and they left – they did all emerge from their cocoons and flew away because I did not find any dead bodies in the release area. I’ve got a better location picked out for next year. And I have had some success with mason bees in the past, so I’m chalking it up to poor planning on my part.

– Squirrels. I lost a lot of seedlings (especially tomatoes and squash) to pesky little squirrels. I mentioned it above but I will be constructing some chicken wire domes to protect my young seedlings next spring.

One of the things I am glad that I took the time to do was take regular pictures of the back yard. The intention was to do this bi-weekly, but it turned into once every two months (which is better than nothing!). This gives you an idea of what my garden looks like throughout the seasons:

Processed with Moldiv

Clockwise from top left: March 2014, June 2014, October 2014, August 2014

Even though it doesn’t always seem like it to me, we did accomplish quite a bit in the garden this year and it really does keep getting better with every growing season. I’m really looking forward to what next year has to bring us – trying lots of new hot peppers, a few new tomatoes, and hopefully expanding our edible growing operation in to the front yard. In addition to that, we’re hoping to remove most, if not all, the sod from our front yard (it’s a huge project)! What are some of the highlights and lowlights from your growing season?


The Last of the Tomatoes

You might remember that we had an unexpected snow storm in early September which forced me to harvest all of my unripe tomatoes far earlier than I’d wanted. So we’ve been eating away at them for a few weeks as they ripened and I ended up giving away quite a few, but we still had lots left over. They’d all ripened indoors and were sitting in cardboard boxes in the corner of my dining room up until a couple of hours ago. Some were even starting to resemble prunes, so I decided I needed to do something with them now or run the risk of losing them. I’ve heard of people freezing cherry tomatoes whole, but I’ve never actually tried it. My go-to method is roasting them first. And it is so easy!

First, start by washing and drying the tomatoes and cutting them up – I had tomatoes of all sizes: the tiny ones were just stabbed with a knife, the regular cherry tomatoes were cut in half, and the smallish/medium sized tomatoes were quartered. Toss the cut up tomatoes with some olive oil, salt and pepper (you may choose to add some herbs as well, such as basil or oregano – or get really crazy and add some hot chili flakes), then lay them in a single layer on a baking sheet – I covered mine in foil and then parchment paper because I am too lazy to do dishes (let’s call a spade a spade here).

IMG_2552

Next you’ll roast them in the oven at about 350 degrees for 45 minutes or so (until they look roasted enough to you – very scientific).

IMG_2557

After they’re roasted to perfection, let them cool to room temperature and put them in to smaller freezer bags. In the winter, I add them to homemade pizza and add into soups in place of canned tomatoes (like beef barley and minestrone). Roasting them really brings out the flavor and preserves that little bit of summer to enjoy throughout the dark and cold months.

A Little Project

With the gardening season basically wrapped up, I am settling in for winter. This includes getting to all of those indoor projects that I’ve been putting off for months (I’m looking at you powder room!), as well as creating new projects to do (because I just love to pile on the projects!). One of those projects that I’ve been wanting to do for awhile is put together a little terrarium. I’ve made some simple terrariums before using just plants and glass vessels but I’ve always killed them by getting high maintenance plants (that’s my theory anyway).

Terrariums have intrigued me ever since they started to gain popularity a couple of years ago. The reason I think I am so attracted to them is that they remind me of building dioramas in school as a kid but also because they allow creativity in the gardening world. Sometimes gardening gets a bad rap as being an old person activity, which I am fine with because I’m basically a 75 year old woman at heart, but gardening can also be an excellent creative outlet for people of any age.

I mentioned it above, but I took my inspiration from building dioramas in school as a kid, as well as a bit of inspiration from my model train-crazed brother-in-law who has an amazing layout. I would love to be able to dedicate the time and money into making adult-like dioramas in shadow boxes but I thought I’d start small to begin with. I had a lot of fun putting together the terrarium itself but also a ton of fun searching online before-hand for inspiration and ideas, including this X-Files themed terrarium (!!!!!), but in the end, I decided to put together my own. I might still do a version of the X-Files one, it is pretty amazing (we’re huge X-Files geeks in my house!).

So here is the finished terrarium in all of its glory – a little family that have all piled in to the car during summer vacation stopping to take a photo. I kept it fairly simple but I may do some revisions, such as adding a dead body in the woods behind the innocent family (I can be so dark sometimes), but for now I’ll keep it as is.

IMG_2539

There are tons of how-to instructions online for building your own terrarium so I won’t go in to all the detail. The main thing is to ensure you choose plants that you can easily care for and that you can provide with the ideal growing conditions, ensure your vessel has adequate drainage, and place it in an area you will not forget about (or set reminders in your phone to regularly check your plant).

The vessel is a brass serving bowl that I picked up at Target (I lined the inside with plastic before I put any dirt in it as well as put a few rocks in the bottom for drainage and so I wouldn’t have to add so much dirt), the figurines are model train HO scale figures I purchased online and the plants I purchased at my local garden centre. I’m really looking forward to the plants spreading a bit and filling out the bowl.

IMG_2528

Now fingers crossed I don’t murder the terrarium! It is a long weekend for me here so I have a lot of things on the agenda, including picking up a new vintage piece (I’ll fill you in later – I have some bedroom updates planned!), working on my powder room, hopefully finishing my sewing table project, doing some knitting, and hopefully lots of relaxation! Whatever you’re doing this weekend, I hope it is something special!